Showing posts with label cooking. Show all posts

Friday, August 26, 2011

Recipe Duo - Grilled Figs and Asparagus

I love grilling in the summer.  Well, I love grilling all year long.  Looking for a grilled appetizer to make, I found fresh figs and beautiful asparagus.  I couldn't decide, so I bought both.  This duo doesn't have to go together, but the sweet and salty components sure did complement each other nicely. This is what I came up with:

Everything ready to go.
Grilled Figs with Goat Cheese

Ingredients:
Fresh figs
Olive Oil
Cracked pepper
Kosher salt
Goat Cheese

Coat the outside of the figs lightly with olive oil.  Quarter the figs and place on a grill pan (easier to get onto and off of the hot grill).  Heat your grill.  Place the figs on the hot grill for about 10 minutes, or until the figs appear to wilt, or become juicy. 
Spoon a scant teaspoon of goat cheese onto each fig while hot. Sprinkle with cracked pepper and salt to taste.
Serve with Balsamic Syrup.  Delicious!
Ready to go on the grill.

Prosciutto Wrapped Grilled Asparagus

Ingredients:
Fresh, plump asparagus spears
Prosciutto
Cracked pepper
Olive Oil

Cut your prosciutto slices in half.  Wrap each spear of asparagus with 1/2 slice prosciutto.  (You can use a whole slice of prosciutto, if you want a meatier appetizer) Brush the exposed tips and ends of the asparagus with olive oil.  Place on a grill tray.  Grill until the asparagus are bright green and tender and the prosciutto is crispy. 
Sprinkle with cracked pepper.
Serve with Balsamic Syrup.  Enjoy!
After they've been grilled, the Prosciutto is crispy, the figs are juicy.

Balsamic Syrup

Ingredients:
Balsamic Vinegar
(that's it)

Place about 1 cup of balsamic vinegar in a small sauce pan.  Bring to a low boil.  Simmer for about 15 minutes until thickened.  I reduced by about one third.  I wanted my syrup thick but not gluey.
Let cool.  Serve with grilled vegetables.
The finished appetizer - ready to eat!

Monday, August 22, 2011

No Apology

So, it has been almost a month since I have posted on either blog.  Without apology.  The end of summer vacation was a stronger draw than the uncomfortable office chair in our warm and stuffy office.  Plus, I have found that if I blog with the sense of obligation, it will feel like a job, a duty, a chore, a chore worse than doing laundry.  So, I blog without obligation, without apology. 
The end of summer was filled with bike rides, a trip to Elitch Gardens Amusement Park, trips to the farmers market, back to school shopping, afternoons at the local pool and making s'mores.  No regrets.
But, I am back.  To share more art, more recipes, more about my little town.
I found this little man of an eggplant at the Isabelle Farm Stand at Thomas Open Space in Lafayette, Colorado.
I asked the farmer who grew the eggplant, how he got "arms" to grow.  He told us he talks to them.  That made me smile, thinking of this young man stooping over to cajole the eggplant into growing appendages.  I am going to have a hard time cutting this one up.  I think he's so cute with his two arms and little hat. 

My favorite way to prepare eggplant is to slice it and grill until soft.  I usually salt the slices and let them sit for a few hours before grilling, that will take out the bitterness.  Grilled eggplant is decadent served with a smear of goat cheese and a drizzle of balsamic vinegar.  But, I like it plain, too.

I may just have to start with the two Japanese eggplant and save the little man another day!

Friday, July 22, 2011

Recipe - Cucumber Basil Martini

Is it happy hour, yet?  Now, here's the perfect summer cocktail.  It is of my own creation, I hope you enjoy it!

Cucumber Basil Martini

Ingredients
2 oz. Gin
1.2 oz. Extra Dry Vermouth
splash olive juice (optional)
1 slices cucumber
2 leaves basil
crushed ice

Muddle the cucumber and basil leaves in the bottom of a shaker.  Add crushed ice.  Add all the liquids and shake.  Strain into a pre-chilled glass.  Garnish with olives or cucumber.  I like mine a bit chunky, so I opened the shaker and spooned a bit of crushed ice, and a few basil leaves and cucumber pieces into my glass.
(Note:  If you aren't a gin drinker, you could always use vodka.  But, it's a shame to not drink gin!)
Relax and Enjoy!

Friday, July 8, 2011

Recipe - Grandma's Cobbler

My mom and I loved to go shopping and out to lunch.  It was kind of a special treat to go to the mall and eat at Grandma's.  The mall, now defunct, was fun to walk around, but Grandma's Restaurant, was really our favorite.  It had that 80's "country charm" that was so popular then (and not so much now). The menu items were simple and homey, with a Southern bent.  We always ordered the cobbler; my favorite was peach. 

One day my mom asked the waitress if they would share the recipe.  She sent the cook out, who spouted off the recipe and my mom took notes.  The recipe came with quantities that would feed a mess hall, but we cut it down and I have been using the recipe for Grandma's Cobbler ever since.
This time I used mixed berries, but you can use whatever fresh fruit is in season.  In a pinch, I am sure frozen fruit would work well, too.

Grandma's Cobbler

Ingredients
3 cups mixed berries or sliced peaches
1 cup flour
1 1/4 cup sugar (divided)
1 cup milk
1 egg
1 stick butter, melted
1/4 cup dry tapioca (or less)
1 1/2 t baking powder
1 t vanilla
1/2 t cinnamon (optional)

Preheat oven to 350 degrees.  Mix berries, 1/4 cup sugar, 2 T tapioca (use 1/4 cup for juicier fruit), and 1/2 stick of melted butter.  Let sit while you mix the batter.
Mix 1 cup flour, 1 cup sugar, 1 egg and 1 cup milk in a bowl, until smooth.  Add vanilla and cinnamon.

Pour 1/2 stick of melted butter in 8 x 8 baking dish (I used a round one with no difference).  Top with batter.  Top the batter with the berries. 

Bake at 350 degrees for 45 minutes or until golden brown.
Serve warm with vanilla ice cream.

The result of this recipe is a warm baked fruit with a golden cakey topping.  You could certainly experiment with different combinations of fruit.  Next time I want to try adding an oat or granola topping to add extra crunch.

I hope you enjoy this as much as we did.

Thursday, June 9, 2011

Recipe - Lemon Poppy Cookies

My friend, Angie, from The Purple Poppy asked me if I could make cookies for the 1-year anniversary celebration at her store.  I said, sure.  But not just any cookies - purple poppy cookies.  I said, sure.  A recipe from Martha Steward.  Again, I said, sure.  I crossed my fingers and knocked on wood that these cookies would come out the way she wanted.  I made a tester batch and everything seemed ok.  So, it was a go!
The recipe, from Martha Stewart's website, was actually pretty simple and easy to follow.  And if you don't look at her photo too closely, mine look pretty good.
I am delivering the cookies today.  If you want to try them out, go to The Purple Poppy anniversary party tonight.  The shop is located at the corner of 95th and Arapahoe Road in the Atlas Valley shopping center in Lafayette, Colorado.
So, I would consider this baking adventure a success.  Will I consider a career change, I am not so sure.

I made these!
Martha Stewart’s Poppy-Shaped Lemon Cookies
Ingredients
2 sticks unsalted butter, room temperature
3/4 cup confectioners' sugar
1 teaspoon pure vanilla extract
1 tablespoon finely grated lemon zest, plus 2 tablespoons fresh lemon juice
2 cups all-purpose flour, plus more for surface
Salt

For Decorating the Cookies:
Royal Icing, plain and/or tinted (below)
Poppy seeds, for sprinkling

Directions
1. Beat butter, sugar, vanilla, and lemon zest and juice until combined. Beat in flour and 1/2 teaspoon salt. Wrap dough in plastic wrap, and refrigerate until firm, at least 2 hours.

2. Turn out dough onto a lightly floured surface, and roll out to a scant 1/4-inch thickness. Cut out about using 2 sizes of flower cookie cutters. (It is helpful to place only one size on a cookie sheet for even baking.) Transfer to parchment-lined baking sheets, wrap in plastic wrap, and refrigerate for 30 minutes. Preheat oven to 350 degrees.

3. Bake until edges just start to brown, 14 to 18 minutes. Let cool completely.

4. Decorate the cookies: Transfer each batch of tinted icing to a separate pastry bag fitted with a small round tip (you can use as many colors as desired). Pipe an outline of icing around the edges, then "flood" each cookie with more icing to cover. Immediately pipe a circle of small dots in the center of each cookie using a different-colored icing. Drag dots to outer edges using a toothpick to create thin lines. Repeat with remaining cookies and icing. Transfer cookies to parchment-lined baking sheets, and let dry completely, about 30 minutes.

5. Once cookies are set, pipe a large dot in the center of each cookie using the same tinted icing as the small dots. Gently sprinkle poppy seeds around large dot. Let dry completely.


Dani Fiore’s Royal Icing
Ingredients
1/2 cup meringue powder
2 pounds confectioners' sugar (8 cups)
2 teaspoons freshly squeezed lemon juice

Directions
1. Using a hand mixer with the whisk attachment, mix together meringue powder with 1 cup water until soft peaks form, about 1 minute. Using the beater attachments, add sugar and lemon juice; continue mixing until well combined, scraping down the sides of the bowl as necessary.

*tip- do not over whip the meringue powder, or your icing will be too fluffy and will never dry. The finished product should have a matte-finish, dry and crisp icing topping.

Enjoy!


Friday, May 27, 2011

Recipe - Flank Steak Marinade

Another family favorite for summer-time grilling.  This is my go-to recipe for grilled flank steak.  This recipe came to me with no measurements from my mom, but was originally from my Great Aunt Jane and Great Uncle Fred.   It would also work well on flatiron steak.
Flank Steak Marinade
1 cup red wine
1 cup soy sauce
1/4 c olive oil
2-3 T chopped fresh thyme
2 cloves garlic, pressed
black pepper, freshly ground

Mix all ingredients.  Put marinade and steak into a ziplock, seal tightly.  Marinate for several hours, up to 24. 
Drain and grill to your desired degree of doneness.

This marinade does a great job of imparting delicious flavors that enhance the steak.  It is a great one to serve to company.  I like to serve with crusty French bread, grilled vegetables and a bright summer salad, and of course a glass of wine.  One of the best!

Friday, May 6, 2011

Recipe - Homemade Pancakes

This recipe comes from my favorite cookbook, Passion for Good Food and Lively Kitchens, by my friend Lisa Maloney.  Unfortunately it's not published.  She put a collection of her favorite recipes together for friends and family and bound them together for a Christmas gift years ago.  Our copy is well-work and used almost weekly. 

One of our favorite recipes is this one:
Homemade Pancakes
1 1/4 c all purpose flour
2 1/2 t baking powder
2 T sugar
3/4 t salt
1 egg
2 T melted butter

Mix all the dry ingredients in a medium bowl.  In a small bowl, beat egg, add milk and melted butter.  Add wet ingredients to the dry, whisk gently.  Mix until just incorporated.  Do not over mix.

Heat griddle.  Cook over medium heat until bubbles form and stay open, then flip and cook until golden brown. 
Variation:  Add 2 T wheat germ to the dry ingredients.  Add a smidge more milk to the batter, as needed, after mixing.  The wheat germ will thicken the batter quite a bit.  I usually add 2 -3 T more milk.

These are our favorite pancakes.  Serve with real maple syrup and fresh berries.   And, if my kids happen to be making breakfast, they will also add a bit of Special Dark Chocolate Syrup and whipped cream.  It makes for the perfect "fancy breakfast."  Perfect for Mother's Day!  Mmmm.

Wednesday, April 20, 2011

Foodie Fieldtrip

Several weeks ago my friend, Shanon, and I ventured north to the city of Longmont, Colorado, for a fabulous foodie experience.
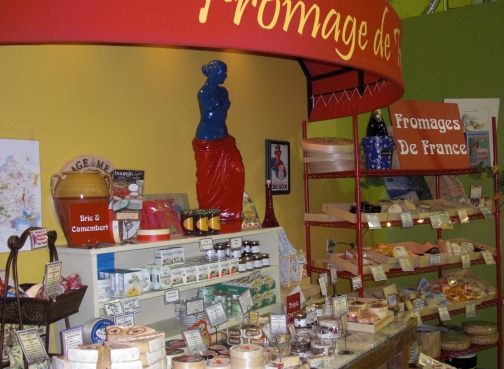
We arrived at the Willow River Cheese Importers.  Their red awnings and umbrellas mark a friendly welcome in this somewhat industrial neighborhood.
The shelves are filled with delightful treasures from Europe.  Dishes and pottery, glassware; cookies, crackers and candies; herbs, oils and seasonings, cookbooks, travel books, and cards; linens, napkins, and other kitchen and dining accessories. The rooms and shelves are overloaded with everything a foodie could desire.  Plus there are tons of nice treats for gift giving.
After looking all around the two rooms of the shop, we venture in to the coolers.  We aren't talking any wimpy cheese cooler; the Cheese Importers have warehouse sized refrigerated rooms.  In fact, you have to put on a parka to enter.  We put on the lovely blue and gold parkas, that look a little like what prisoners wear when working on the side of the road.  We ventured inside the massive cool room.
The cheese is displayed by type, with clear signs telling the country of origin and the taste qualities.  There are even samples placed throughout so that you can try something new.  Amongst the cheeses are speciality crackers, fruit pastes, tapanades, and other complimentary food items.  It is fun to look for the cheese that costs the most (up to $40 per pound) or the one that looks the most strange.  There are wonderful hand crafted cheeses from around the world.  And, if you take a look, many of them have small, inexpensive pieces you can purchase to try something new at home.
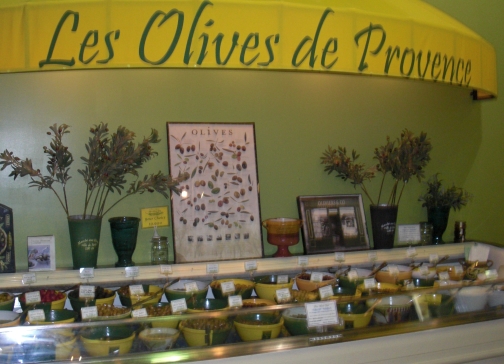
Then, you get to the olive bar.  "Les Olives de Provence" It is a glorious thing, for those who love olives.  there are olives of all types and colors, as well as capers, caperberries, and cornichons. 
We ended our lovely day by going out to lunch and looking in the few boutiques that are in downtown Longmont. What did we order? A gourmet cheese plate, of course. 
If you are ever in Longmont, take the time to find the Cheese Importers. You won't be sorry you did.

Friday, April 8, 2011

Recipe - Grilled Artichokes & Horseradish Dill Dip

I love spring.  I love the flowers, the rain showers and fresh seasonal vegetables.  Artichokes are one of our favorites.  They are great because they are low calorie and low carb and fun to eat.  Paired with a low fat or no fat yogurt dip they become a great appetizer, side dish or lunch.  Steaming them or boiling them is an easy option.  If you grill them, they somehow become just a bit fancier.  We had these last week, and they were delicious.

Grilled Artichokes
Artichokes
1 whole lemon, cut in half
2-3 gloves garlic
2 T olive oil

Thoroughly wash artichokes under running water.  Trim stem end to about 1 inch.  Cut off pointy top of artichoke with serrated knife, about 1 inch from top.  Trim pointy tops of artichoke leaves with kitchen scissors.  (Or, I found Globe Artichokes this time, and needed no top trimming.)  Rub cut surfaces with lemon half to prevent browning.
Fill large pot with 2-3 inches of water.  Squeeze lemon juice into water, then drop the used rinds into the pot.  Smash garlic and drop into pot.  If using a steamer basket, place basket (I often do not)  Arrange artichokes in water or on basket.  Cover pot and turn on to boil.  Boil for 25-45 minutes.  Depending on size of artichoke, until a bottom leaf will pull out with some resistance.  Do not wait until the artichoke is too soft.
Cool artichokes.
When cool, quarter artichokes.  Scoop out the choke with a spoon or small paring knife.  Toss quarters in more lemon juice and olive oil. 
Grill artichoke quarters on hot grill for 5 minutes per side, or until you see nice char marks.
Serve warm or room temperature with dip.


Horseradish-Dill Dip

¼ cup plain fat-free yogurt
¼ cup (2 ounces) 1/3-less-fat cream cheese, softened
1 tablespoon prepared horseradish (add more to make it extra spicy)
1 ½ teaspoons chopped fresh dill
1 ½ teaspoons fresh lemon juice
3-4 drops hot sauce (optional, to taste)
1/ 8 teaspoon salt
1/8 teaspoon freshly ground black pepper

Combine yogurt and next 6 ingredients (through pepper). Cover and refrigerate for at least 1 hour.
Serve with Grilled Artichokes, roasted or raw vegetables.
  • Dip can be made 2 days ahead of time.
  • Can be made without the cream cheese with similar results, I used fat free Greek yogurt for a thick texture when omitting the cream cheese
  • Dip is excellent served with cut veggies

Friday, March 18, 2011

Recipe - Mom's Brownies


This is my mom's brownie recipe.  The one she got from the back of the Baker's Chocolate Box.  This is the recipe she wrote out - the one she made so often.  The recipe card is well worn, it's been used many times.
Brownies from scratch are really a cinch.  My girls make them - from start to finish, with no help. 
They are gooey, rich, and delicious.  I hope you enjoy.


Brownies

4 squares semi-sweetened chocolate
¾ cup (1 ½ stick) butter
1 ½ cups sugar (with semisweet chocolate, I use 1 1/2 instead of the 2 cups in the original recipe)
3 eggs
1 teaspoon vanilla
1 cup all purpose flour
1 cup nuts (optional) or 1 cup chocolate chips (optional)

Put chocolate and butter in microwavable bowl. Microwave on high for 2 minutes. Stir until chocolate is completely melted. Stir sugar into melted chocolate until well blended. Stir in eggs and vanilla until completely mixed. Mix in flour until well blended. If desired stir in nuts and chocolate chips. Spread into greased 9”x13”. Bake at 350 for 35-40 minutes or until toothpick inserted in center comes out almost clean.


• DO NOT OVERBAKE
• Cool on pan, cut into squares
• Makes 24 brownies

Monday, March 14, 2011

Happy Pi Day!

What are you going to do on Pi Day?

(Photo from 2009 trip to Sayulita, Mexico.)
 Bake a pie?

(Cherry, peach, raspberry pie from summer 2010)


Mixed Berry Pie Recipe
2 pie crust (I used frozen, just a bit easier than making your own.)
4 cups blueberries
2 cups fresh raspberries
2 cups blackberries
zest and juice from 1 lime or lemon
1 cup sugar
4 tablespoons tapioca
1/4 teaspoon almond extract

Preheat oven to 375.
Mix the fruit with the sugar, tapioca, zest, juice and extract. Let sit for 15 minutes.Line the bottom of a deep 9 inch pie plate with first crust. Pour in berry mixture. Top with second crust, pinch edges together. Brush with egg wash and sprinkle with sugar. Cut 4 slits in the top crust.
Place the pie on a foil lined cookie sheet, there will be drips. Bake at 375 degrees for 55 - 65 minutes. After 20 minutes you may need to cover the outer edges of the crust with foil to prevent the crust from browning too much.
Variation:  Use a mix of whatever fruit is in season, cherries (pitted), plums, peaches, nectarines.

It's silly and frivulous, but March 14 is known as International Pi Day (3/14).  If you are ambitious (or bored) you can celebrate Pi day, or learn some Pi facts.  There is even a Pi song for the enthusiast.
I am not sure I will bake a pie today, I may just go to Sweets & Eats in Old Town Lafayette and buy a slice for $3.14.  Appropriate, don't you think?

Friday, March 4, 2011

Recipe - Beer Braised Chicken and Chicken Chili

I cook a lot of chicken.  I am always looking for new and inventive recipes so that chicken dinner isn't boring.  This one was fabulous.  I adapted it from a Rachael Ray Week in a Day recipe.  My whole family loved the flavors in this braised chicken dish.  Instead of potatoes or rice, I served barley as a side; that was a big hit, too.
(We ate all the chicken,
we ate all the chicken chili-
this photo will have to suffice)
 
Beer-Braised Chicken

Ingredients
4 pieces bone-in, skin-off chicken thighs
4 boneless, skinless chicken breasts
Kosher salt and freshly ground black pepper
1 tablespoon extra-virgin olive oil
4 slices bacon, chopped
1 onion, chopped
2 ribs celery, chopped
1 red bell pepper, seeded and chopped
2 cloves garlic, chopped
2 tablespoons chopped fresh thyme
1 rounded tablespoon all-purpose flour
1 (12-ounce) bottle lager beer
1 (14-ounce) can diced tomatoes
1 cup chicken stock
hot sauce (optional)


Pat the chicken, and season with salt and pepper.
Heat 1 tablespoon extra-virgin olive oil in a Dutch oven over medium-high heat, add the chicken and brown on both sides in 2 batches.
Remove the chicken to a plate and add the bacon. Brown for 2 minutes and then add the onion, celery, pepper, garlic, and thyme, and saute, for about 10 minutes over medium heat.
Add the flour, stir 1 to 2 minutes, and then pour in the beer and let the foam subside. Stir in the tomatoes, stock, and hot sauce. Let the sauce thicken a bit, and then slide the chicken into the pot and simmer to cook through, or at least 30 minutes to let the flavors marry. Serve with barley, rice, potatoes, or crusty bread, and a big salad.

***********

Then we had leftovers.  Always a dilemma at our house: how to reinvent the leftovers so that it doesn't feel like the same meal again.  This was a great dish to re-invent.  I made a Chicken Chili with the rest of the Braised Chicken and served that another night with tortilla chips and a fresh salad.  Perfect! 
The Chili used all the leftover chicken and sauce as well as the barley I had served as a side.  Everyone loved it - so much so, we ate all of it!

(Leftover) Chicken Chili

Ingredients
Leftovers from Beer Braised Chicken
1 can (14-ounces) Great Northern Beans
1 can (14-ounce) diced tomatoes
1- 2 cups cooked barley
2-4 cups chicken stock
Place vegetables and leftover sauce in pot over low to medium heat. Dice chicken into bite sized pieces. Drain and rinse beans. Add beans and tomatoes (with juices) to the pot. Add barley. Add enough broth to increase the volume, and cover the vegetables.  Simmer for 15 – 30 minutes until heated through.

**************

This was the perfect way to use what was left and we all enjoyed the "new" meal.  What do you do with your leftovers?

Wednesday, February 23, 2011

Happy Rally Day - and trivia ad nauseum....

I found this sweet postcard invitation for Rally Day

What is Rally Day?  I asked myself. A quick check of Google and Wikipedia, found many possible answers. One source says Rally Day is a "warm-hearted homecoming when friends greet one another again," after Labor Day. There are girl scout rally days, church rally days and legislative rally days. Many car clubs use Rally Day to signify a car show - Rally Day in Wiltsire, England brings 10,000 people together to celebrate rally cars
The real Rally Day began at Smith College in 1876 as a celebration of George Washington's birthday. Over the years the celebration has included speeches, awards, performances, music from the glee club, square dancing, carnivals, formal teas, and dinners. This year's Rally Day is today, February 23.

George Washington was born on February 22, 1732. You probably know all the good stuff he did from your American History courses, but did you know he was a high school drop out and never went to college. He never learned Latin, Greek or any foreign language, like his contemporaries. He married late in life, at the ripe old age of 27 and was the happy step-father to Martha's two children.

While Martha was devoted to George, she was a less willing first-lady and is quoted as saying "I think I am more like a state prisoner than anything else, there is certain bounds set for me which I must not depart from..."

Two year's after his departure from office, George fell ill with pneumonia. The pneumonia probably isn't what killed him, though. Most likely, the doctor's prescribed treatment of blood-letting and doses of Mercury Chloride did him in.

But his legacy as the Father of our Country is what we celebrate on Rally Day. Don't forget to put on your Rally Day hats, and send out your Rally Day cards. Be sure to bake yourself a Martha Washington cake (see recipe below) and celebrate Rally Day!

And certainly, don't forget what Martha said:
I am still determined to be cheerful and happy, in whatever situation I may be; for I have also learned from experience that the greater part of our happiness or misery depends upon our dispositions, and not upon our circumstances.
                                                                                             -Martha Washington

Happy Rally Day!


*****
Martha Washington's Great Cake
(One of Mrs. Washington's favorite recipes- I love how this is written, what about bake times and temps and how big of a pan do you need to accommodate 40 eggs and 4 pounds of butter and sugar?!?!)

Take 40 eggs and divide the whites from the yolks and beat them to a froth. Then work 4 pounds of butter to a cream and put the whites of eggs to it a Spoon full at a time till it is well work'd. Then put 4 pounds of sugar finely powdered to it in the same manner then put in the Yolks of eggs and 5 pounds of flour and 5 pounds of fruit. 2 hours will bake it. Add to it half an ounce of mace and nutmeg half a pint of wine and some fresh brandy.
********

(Although Postcardy pointed out on Postcards, Etc. that my postcard is most likely for a children's Sunday School Rally, I still like all the interesting stuff I dug up. Check out Postcardy for some more George Washington facts.)

Friday, February 18, 2011

Recipe - Birthday Cake

I made have made some extra work for myself this year.  I made a "silent" vow to not use boxed cake mixes.  hmmmm.  A challenge, certainly.  Not that I have anything against Betty or Duncan, but I do find that the cakes can be a little boring, a bit too airy if you're getting fancy with carving (as one might do with two girls in the house), and certainly predictable with the 1 cup of oil and three eggs.  I thought, there have to be better options for the modern cook. 
The request was yellow cake and chocolate frosting.  Sounds easy enough.  I turned to the trusty Internet to find a recipe.  I found one for "Best Yellow Layer Cake" at Smitten Kitchen.  I have found other recipes at this site with great success.  This was one to try.
I got out the trusty Kitchen Aid and got to mixing.

Smitten Kitchen's Best Yellow Layer Cake
(adapted from and reprinted following Smitten Kitchen's guidelines.)
Makes two 9-inch round cake layers

4 cups plus 2 tablespoons cake flour (not self-rising)
2 teaspoons baking powder
1 1/2 teaspoons baking soda
1 teaspoon salt
2 sticks unsalted butter, softened
2 cups sugar
2 teaspoons pure vanilla extract
4 large eggs, at room temperature
2 cups buttermilk, well-shaken

Preheat oven to 350°F. Spray or butter two 9-inch round cake pans and line with circles of parchment paper, then butter parchment, as she recommends.  I recently ran out of parchment - it's on the grocery list - so I used the old spay and flour method with good results.
Mix together flour, baking powder, baking soda, and salt in a medium bowl. In a large mixing bowl (yes LARGE), beat butter and sugar with an electric mixer (here's where the Kitchen Aid came it) at medium speed until pale and fluffy, then beat in vanilla. Add eggs 1 at a time, beat well and scrape down the bowl after each addition. At low speed, add buttermilk until just combined (mixture will look curdled). Add flour mixture in three or four batches, mixing until each addition is just incorporated.

Pour batter equally into cake pan, then tap pan on counter several times to remove air bubbles. Bake  at 350 degrees until golden and a wooden pick inserted in center of the cake comes out clean, 35 to 40 minutes. Cool in pans on a rack 10 minutes, then loosen cake from pan and invert onto rack. Let cake cool completely before frosting.

Cooked Chocolate Frosting

The frosting I used I found last year from Country Living.  It reminds me of my Grandmother's frosting, a bit like buttercream, but not as heavy.  It has a silky, smooth texture and is not too sweet.
1 cup milk
3 tablespoons flour
1/8 teaspoon salt
8 ounce) of dark chocolate or white chocolate
2 sticks butter
1 1/2 cups confectioners' sugar
2 tablespoons cocoa, (for white chocolate frosting, omit cocoa)
1 teaspoon vanilla extract

Whisk 1 cup milk, 3 tablespoons flour, and 1⁄8 teaspoon salt in a small saucepan over medium heat until the mixture bubbles and thickens.  This will take several minutes. Transfer to a small bowl and let cool.

Melt 8 ounces of dark chocolate or white chocolate in a glass bowl in the microwave. Be careful not to scorch it. Set aside to cool.

Beat 1 cup butter, 1 1/2 cups confectioners' sugar, and 2 tablespoons cocoa (for white chocolate frosting, omit cocoa) together until light and fluffy. Beat in the cooled chocolate and add milk mixture and 1 teaspoon vanilla extract (dark chocolate frosting only) until smooth and fluffy.

The Result
The baked layers were sunken a bit in the middle.  I am sure there is a reasonable explanation for that: the humidity was wrong, or the altitude, or I didn't sift the flour well enough, or the cartwheels I did in the kitchen while baking sunk the middles.  Baking is still a bit of a mystery to me.
My handy dandy solution is to trim the cake a bit, then I spread the bottom cake with a layer of raspberry jam, and then frosting.  A nice and sweet surprise. 
The birthday girl liked the cake.  We all liked the cake.  It did seem a little dense, that's what I was looking for, right?  Yes, I bought the cake flour, maybe the plus 2T was more than I needed.  But, I didn't sift.  I never do.  Is it reall that important?
It was not too sweet, but had a great "yellow cake" flavor. 
I love this frosting.  I started using it last year, when I banned tub frosting from the house.  It can even perk up box mix cupcakes.  The white chocolate version is my favorite.
This is definately a cake I will make again.  And a frosting I will make again.
If you decide to ditch the box cakes, these are two worthwhile recipes to try.

I've linked to Full Plate Thursday and Foodie Friday.  and Sweet Tooth Friday.  Check them out for some more great recipes.

Wednesday, February 2, 2011

Menu for Book Club

I love cooking.  I also love planning.  So, the natural marriage of these two is menu planning. I love planning menus.
Strange. 
Perhaps.
A little thought into a menu can go a long way towards making your night as a host(ess) and your guest's night in your home so much more comfortable and relaxed.
This week, I am hosting book club.  We have been together for three years.  There are seven of us.  Things to keep in mind as I plan the evening.  Our standard is that the hostess makes appetizers and a dessert, while the rest of the group brings wine.  Usually the appetizers are on the substantial side, we're not talking a bowl of Cheetos for these ladies.  Sometimes, if the book merits, there is a full blown dinner in the works.  My Life in France, Hindi Bindi Club, and Heat resulted in fabulous and elaborate dinners. 
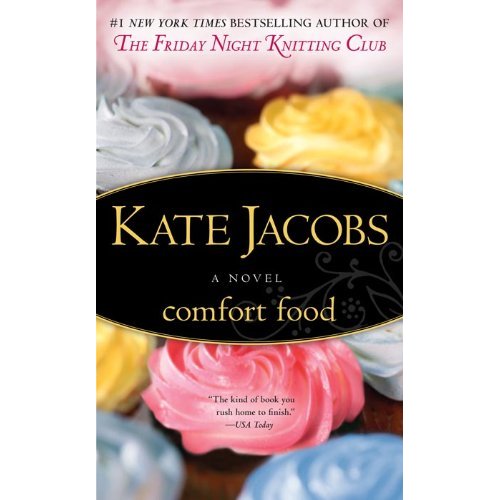
This month we read Comfort Food, by Kate Jacobs.  We'd read another of Jacob's books before, Friday Night Knitting Club.  That one had recipes included.  This one, the book about food, does not.  We do not have a "Book Club Rule" that states the food has to match the book.  In most cases it does not.  In most cases it would be too difficult. 
Tonight, however, I want comfort food.  Perhaps it's our sub-zero weather.  Perhaps it's that cozy feeling that comes with curling up to read a good chick lit book.  To plan the menu, I started thinking of my favorite comfort foods.  Warm soup, hot dips, gooey fruity desserts.

I recently received two Barefoot Contessa Cookbooks.  I absolutely love them.  And since the main character of Comfort Food, Gus, reminds me of Ina Garten, I turned to these books to search for recipes for my menu.  In her cookbooks, Garten offers sage advice for planning and hosting.  Choose items you can make ahead of time.  Make things that will appeal to all your guests.  Keep it simple and good.  She is a wise woman.
For a soup, I chose Roasted Winter Vegetable Soup.  It's a thick, rich looking soup, without a drop of cream, so it's on the lighter side, right?  To balance the sweetness that will be in the soup, I chose a crisp salad with sharp flavors, Endive with Stilton and Walnuts.  Rounding out the meal, I am making Rosemary Polenta Triangles.  I want to start and finish the meal with something warm.  Let's start with the tried and true Hot Artichoke Dip (add some chopped spinach to make it different). And for a finale, this Caramel Pear Cake looks divine.

The Menu:
Hot Artichoke and Spinach Dip
2 kinds of cheese
Crackers
Olives
Roasted Winter Vegetable Soup with Homemade Brioche Croutons
Winter Greens Salad with Stilton and Walnuts
Rosemary Polenta Triangles
Caramel Pear Cake with Homemade Spiced Whipped Cream

What I learned in my reading and planning:
  • keep it simple. (I am showing HUGE restraint in only making one appetizer - I tend to follow the "more is better" motto.)
  • make as much as you can ahead of time.
  • use flavors that appeal to a lot of people.
  • cook with what's in season.
  • choose flavors that complement the others. 
  • also incorporate a culinary variety - salty, sweet, creamy, smooth, crunchy, acidic, spicy.
  • repeat flavors to create harmony in the menu.  But don't go overboard.  (I added some rosemary to the croutons to echo the rosemary in the polenta, but I am not also making rosemary artichoke dip, rosemary squash soup and rosemary pear cake.)
I am breaking one big rule:  don't try out new recipes on a special event.  I have four new recipes on board for tonight.  But, who better to try out something new, than your girlfriends?  I will let you know how it goes.

Friday, January 28, 2011

Recipe - Oven Roasted Tomatoes

My late harvest of garden tomatoes and a pepper from last October.
Tomatoes.  Not exactly a wintertime vegetable.  But this recipe will turn a mediocre tomato into something delicious.  It is a handy solution for an over abundance of garden tomatoes.  It is also a quick fix for what to do with the tomatoes that are in your fridge - with no plans to use them.  Slow roast them in the oven.

Oven Roasted Tomatoes
2 cups tomatoes (cherry tomatoes, grape tomatoes, or Roma tomatoes)
1 T olive oil
1 t dried rosemary (or basil or oregano)
kosher salt
fresh cracked pepper

Pre-heat your oven to 250 degrees.  Cut grape tomatoes or Roma tomatoes in halves.  Cherry tomatoes or smaller grape tomatoes may remain whole.  You may want to quarter larger tomatoes. 

Toss tomatoes in olive oil.  Spread in a single layer on a baking sheet.  Sprinkle with crushed dried herbs, salt and pepper.  Don't overdo the salt, it will  become more concentrated as the tomatoes roast.
Bake in the oven for 2-3 hours.  (I know, 2-3 hours is a big range. Larger tomatoes will take a longer time, smaller ones may be done more quickly.)  After 2 hours, give your tomatoes a stir, and decide how much farther you would like them to roast.  They should be shriveled, but still moist.  They shrink quite a bit, so be sure to make plenty.

The result is a sweet tomato-y bite.  They are a bit chewy, and filled with concentrated tomato flavor.  They are similar to sundried tomatoes, but better.

Store your tomatoes in a container in the refrigerator for up to a week.

What to do with your tomatoes:
  • serve them on a french bread crostini with a smear of goat cheese
  • toss with fresh basil and pasta
  • put them on top of a salad
  • use them in a veggie sandwich
  • add to your cheese plate to compliment Italian cheeses
  • make a roasted tomato pizza with fresh mozzarella
  • chop and mix with feta cheese, chopped kalmata olives and fresh herbs to make a tapanade
  • puree them with a touch of olive oil to make a spread
  • add them to your Antipasti Platter
  • eat them plain, they are yummy!

Friday, January 21, 2011

Recipe - Spicy Roasted Garbanzo Beans

This spicy, crispy, chewy snack is just what to make to have a relatively guilt free snack around the house.  Made from Chickpeas, also known as Garbanzo Beans, this recipe is filled with protein and fiber, and low in fat.  Its a snap to make.

Roasted Garbanzo Beans
2 cans Garbanzo Beans
2 T olive oil
1 t onion powder
1 t garlic powder
1/2 t chili powder
1/2 t ground cumin
1/4 t chipolte powder
1/4 t cayenne pepper
salt (to taste)
pepper (to taste)

Rinse and drain the beans in a colander.  Spread the wet beans on paper towels to dry.  Dry the beans as much as you can so they roast, not steam, in the oven.  Preheat the oven to 350 degrees.

Place beans in a medium bowl.  Add olive oil and all the seasonings.  Add more or less as to your taste.  Toss the beans to coat evenly with the oil and spices. 

Spread beans onto a large baking sheet.  Roast in the oven for 50 minutes to 1 hour.  They will turn golden and shrink slightly when done.  For crispier beans, cook longer.  For a chewier result, bake for less time. 

These are vegetarian, vegan, gluten free, and terribly delicious. Enjoy!

Friday, January 14, 2011

Recipe - Chicken Saltimbocca

from Cooking Light January/February 2011

In an attempt to make meals more interesting and fulfilling, I have been trying out a lot of new recipes this month.  I love my Cooking Light subscription, and found tons of recipes this issue that I want to try out.  Last night I tried Lemony Chicken Saltimbocca.  It happened to be the cover recipe, and part of their quick and easy meals feature. 

Ingredients
4 (4-ounce) chicken cutlets
1/8 teaspoon salt
12 fresh sage leaves
2 ounces very thinly sliced prosciutto, cut into 8 thin strips
4 teaspoons extra-virgin olive oil, divided
1/3 cup fat-free, lower-sodium chicken broth
1/4 cup fresh lemon juice
1/2 teaspoon cornstarch
Lemon wedges (optional)

Preparation
1. Sprinkle the chicken evenly with salt. Place 3 sage leaves on each cutlet; wrap 2 prosciutto slices around each cutlet, securing sage leaves in place.
2. Heat a large skillet over medium heat. Add 1 tablespoon oil to pan, and swirl to coat. Add chicken to pan; cook for 2 minutes on each side or until done. Remove chicken from pan; keep warm.
3. Combine broth, lemon juice, and cornstarch in a small bowl; stir with a whisk until smooth. Add cornstarch mixture and the remaining 1 teaspoon olive oil to pan; bring to a boil, stirring constantly. Cook for 1 minute or until slightly thickened, stirring constantly with a whisk. Spoon sauce over chicken. Serve with lemon wedges, if desired.


The recipe won two thumbs up all around the table!  It was easy to make, it took about 20 minutes.  It was juicy and delicious.  Lemony sauce was great with angel hair pasta and broccoli.  Although my food styling skills may be lacking, my photo looks pretty close to the original in the magazine.  Definitely one I will make again.

Also in this month's issue:
Chicken with Mushroom Sauce:  we had that last week, two thumbs up!
Sauteed Chicken with Sage Browned Butter:  that's for tonight.  I will let you know how it goes.
Italian Beef Stew:  I will try this one next week.  It looks delicious!

Friday, December 17, 2010

Recipe - Artichoke Dip

Do you need a quick appetizer to take to a party?  Perhaps you need something easy to make before your holiday dinner.  This is a no-fail, quick, hot Artichoke dip that you will love.

Artichoke Dip
1 – 8 oz. package of (less fat) cream cheese, softened
1 cup mayonnaise
1 cup shredded Asiago cheese
1 clove garlic, pressed
1 Tablespoon dill or dill blend seasoning
1 can artichoke hearts (not marinated), drained and chopped
1/2 lemon zest (optional)
1 t lemon juice (optional)
4-5 drops hot sauce (I use Cholula brand)

Mix softened cream cheese with remaining ingredients.  Put into small baking dish; bake 350 until bubbly, approx. 30 – 40 min.
Serve with crackers, veggies or French bread.

  • This recipe can easily be doubled.
  • VARIATION:  For a southwestern twist on artichoke dip, add 1 small can of chopped, mild green chiles.  Omit the lemon juice and zest.
  • This recipe can be made a day ahead.  Mix the ingredients, place in baker, cover and refrigerate.  Bake prior to serving.

Friday, December 3, 2010

Recipe - Antipasti & Marinated Vegetables

This is one of my favorite appetizers to serve at a party or before Thanksgiving or Christmas dinner.  I love the art of it.  Just look at the color and the texture.  The flavors are just as good.  The sweet marinated cherry peppers play nicely off the hard, salty cheese and the crisp and tangy vegetables.  Serve with good bread and good wine.  Each person can mix and match to suit their tastes.  It's a crowd pleaser!

Antipasti Platter

1 pound assorted sliced, gourmet deli meats (such as Italian salami, spicy capocollo, prosciutto,  and mortadella)
1/2 pound high quality Parmigiano-Reggiano, cut into irregular chunks
Marinated vegetables (recipe follows)
Marinated artichoke hearts
Kalamata or Marinated Olives
Peperoncini or marinated cherry peppers (or both)
1 loaf focaccia bread, sliced
1 box crispy Italian breadsticks

Arrange the meats, cheeses, and focaccia on a large platter. Place the marinated vegetables, olives and peppers in small serving bowls.  Place breadsticks, upright, in a decorative container. 

Marinated Vegetables
8 cups assorted vegetables (such as carrots, green beans, zucchini, cauliflower, and broccoli)
3/4 cup olive oil
1/4 cup red wine vinegar
2 tablespoons water
2 garlic cloves, pressed
1 teaspoon dried thyme leaves
1 teaspoon salt
1/2 teaspoon sugar
1/2 teaspoon hot pepper sauce

Cut the carrots and zucchini into long stick, about ¼ wide.  Break cauliflower and broccoli into florets.  Blanch each type of vegetable to desired doneness.  They should be bright and crisp.  Stop the cooking by rinsing in cold water.  Drain well.

Whisk all remaining ingredients in bowl; toss with vegetable mixture. Cover and refrigerate at least 6 hours and up to 2 days. Bring vegetables to room temperature. Season with salt and pepper; serve.

  • Find a good olive bar to buy the peppers and olives.  Any variety of interesting olives and peppers would work for the platter.
  • Use a variety of meats, vegetables, olives and peppers to create colorful appetizer.